Overview and Highlights #
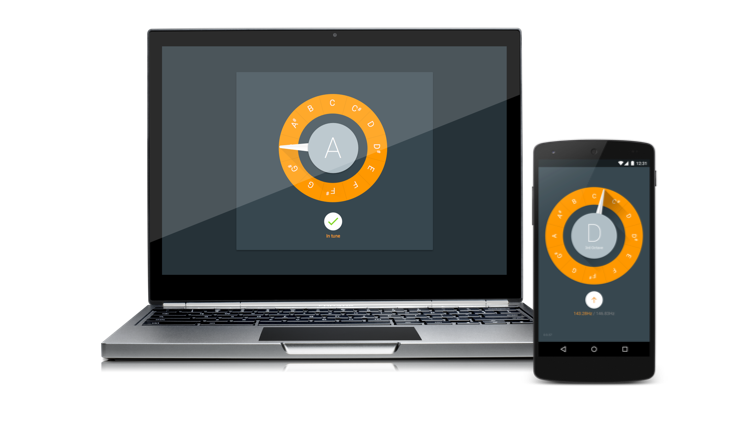
Guitar Tuner, despite its cryptic name, is a web app that helps you tune a guitar. I'm sure you, like me, are shocked at this revelation.
Here's some of the things it has:
- Web Components. It's the perfect time to give Web Components a run out. In this case I had the idea that I could have three components: one to handle the audio input and analysis; one for the dial; and one for the instructions (tune up, down, etc).
- Service Worker for offline. Sure, why not? It's effectively a single page app, and that means adding on Service Worker support should be super simple. Plus offline support is the sport of winners.
- Web Manifest. On the off-chance someone wants to add the app to their homescreen, it seems like it would be good to provide a nice icon, short name, and set up some preferences for how the app should behave. Yay manifests!
- ES6 classes, fat arrow functions, and Promises. I gave these a run out recently, and I got hooked. I'm not going back to ES5 unless you drag me, so they're in here, too. But I also used them with the Polymer / Web Componenty bits this time around, which was fun.
- Open source. You can get the code and have a look around!
If you're not a guitarist, or you don't have a guitar to hand, you can always check out the video below where I show it in use. Unfortunately it does involve seeing me play the guitar, for which I can only apologise, but hopefully I at least get points for trying.
Big fat caveats #
Nothing quite like couching a thing you've built in a load of just-in-case-it-doesn't-work caveats. So with that in mind...
- I have assumed a standard-tuned, 6-string guitar. If nothing else I don't have a 12-string to hand, and generally they're way less common, and I'm nothing if not a majority panderer when it comes to tuners. You can always submit a patch if you would like to. It may already work, I just don't know.
- The tuning is done through the device's microphone. It's probably going to be (well, it will be) less accurate than a chromatic tuner that uses the vibrations on the guitar's neck to provide frequency information. But in a pinch it could be handy.
- Mobile Safari isn't supported, nor is Internet Explorer. This is because they don't support
getUserMedia, and I can't do much to work around it. If the browser can't listen, it can't help me tune a guitar. Edge will support getUserMedia, though, so that's good news!
Alright, caveats out of the way, let's talk details!
Polymer #
I recently wrote a post about how you can lazy-load and progressively enhance your pages with Polymer. Guitar Tuner uses that exact approach (because I figured it out while I was building the app), and that means I have the Web Components goodies, but the app should be super fast to load. In fact, on WebPageTest the Speed Index for a cable connection is ~450, and on 3G it's ~2800, which I'm very happy about.
It is a small app, mind. The whole thing weighs in at 40.1KB including Polymer (but excluding the 12KB Web Components polyfills), so if it had been slow to load I think I'd have found that more than a little depressing.
You can read the other post if you want the super gory details, but the quick version here is that I'm loading all three of my web components individually, and as each one arrives it upgrades the element it manages. In order to prevent FOUC, I inline some styles in the head of the app's index.html that make it look like this:

When each elements upgrades it removes the placeholder styling. That means the app gets to something that looks “visually complete” much sooner than waiting for the elements to upgrade first.
When each elements upgrades it removes the placeholder styling. That means the app gets to something that looks "visually complete" much sooner than waiting for the elements to upgrade first.
The elements all race to get Polymer, and, because of the way HTML Imports work and because Polymer is always requested with the same URL, we only request it once. Once loaded, all three components will be able to use it.
Web Components #
The app contains three Web Components:
<audio-processor>. This is responsible for requesting microphone access throughgetUserMedia, and will pop up a toast if there are errors. It also uses the Page Visibility API to toggle microphone access so if you hide the app, then microphone access is disabled, and re-enabled once you switch back to the app. It also figures out what the dominant frequency is in the audio and dispatches events with that value, the octave and the nearest note.<audio-visualizer>. This is a canvas-backed element that draws a dial indicating the current tone. It receives the events from<audio-processor>and updates the dial, note and octave info.<tuning-instructions>. This also receives the events from<audio-processor>. It uses that to figure out to which string it thinks you're nearest, and then advises you of the target frequency and whether you should tune up or down.
I think one of the really nice bits of Web Components is that it encourages healthy code decoupling. Sure you can achieve it anyway without making components, but I just find that it helps to have a nudge every now and then! And of course I can now bundle up the logic so if I need any more audio mangling I have an element ready to go.
I did have a bit and "umm" and an "ahh" over whether or not something like an
<audio-processor>should be an element or not.
I did have a bit and "umm" and an "ahh" over whether or not something like an <audio-processor> should be an element or not. On the one hand it doesn't really offer any semantic value to have it there in the DOM, on the other it can dispatch events, which is really handy. Clearly you can see which way I came down on this one since there is an <audio-processor> element, but I wouldn't blame anyone for calling it the other way.
ES6 Classes + Polymer #
Apparently when it comes to Web Components the theory goes that you'll ultimately be able to do something like this with ES6 Classes:
class MyRadElement extends HTMLElement {
// Wow this class would be amazing... wait, no.
// It would be amaze. I'm so down with the kids.
}
But so far as I can tell that particular syntax is still TBC. I'm also using Polymer, so I was like, mayyyybe instead of giving Polymer an object I could give it a class's prototype:
class MyRadElement {
constructor () {
Polymer(MyRadElement.prototype);
}

get is () {
return 'my-rad-element';
}
}
You can't pass the class itself (or an instance) to Polymer, because without sugar the class is a function and the Web Components registerElement function that Polymer calls expects an object as its second parameter, not a function. It also expect a tag name as its first, so I used a getter for is because it appears as a property on the prototype. I guess I could have done this.constructor.prototype.is = 'my-rad-element', but getters look neater to me.
Another side-effect of this approach is that you don't get to use an instance of the class anywhere, so anything you would have done in constructor now needs to be done in the created and attached callbacks, which is a bit limiting but also no big deal. I guess that's just the nature of using a class / function instead of an object.
All of this isn’t strictly necessary, or even remotely so; there’s nothing wrong with giving Polymer an object.
All of this isn't strictly necessary, or even remotely so; there's nothing wrong with giving Polymer an object. But I like ES6 Classes (controversial, I know) and if I'm in ES6 world, or want to be, why not just try and get it all working nicely? Yes? Winner.
Audio Analysis the wrong way #
With elements in place, let's talk about analysing audio, because I thought this bit was going to be relatively easy to do. I was wrong. Very wrong. Essentially I'm a clown and still haven't learned to estimate work well. But let me see if I can't make it easier for the next troubled soul who attempts to do something similar.
To begin with let me tell you about failing. Not real failing, though, the Edison style of failing:
"I have not failed. I've just found 10,000 ways that won't work."
Attempt number one, then: Fast Fourier Transforms, or FFTs. If you're not familiar with them, what they do is give you a breakdown of the current audio in frequency buckets. The Web Audio API can let you get access to that data in - say - a requestAnimationFrame with an AnalyserNode, on which you call getFloatFrequencyData.

I thought that if I took an FFT of the audio, I would be able to step through that, look for the most active frequency. Then it's a case of figuring out which string it's likely to be based on the frequency, and then providing "tune up", "tune down", or "in tune" messages accordingly.
Then performance happened. And harmonics. Mainly harmonics.
Performance #
In the end this approach yielded something with a frame rate that fluctuated wildly between 30 and 60fps, and something which can only be described by its friends as a "CPU melter".
In order to get enough resolution on frequencies, you need a colossal FFT for this approach. With an FFT of 32K (the largest you can get), each bucket in the array represents a frequency range just shy of 3Hz.
Filling up an array of that size takes somewhere in the region of 11ms on a Nexus 5 on a good day with a following wind. If you're trying to do that in a requestAnimationFrame callback, you're going to have a bad time. Doubly bad is the fact that you're also going to have to process the audio data after getting it. For 60fps you have about 8-10ms of JavaScript time at the absolute maximum. The browser has housekeeping to do, so you have to share CPU time. In the end this approach yielded something with a frame rate that fluctuated wildly between 30 and 60fps, and something which can only be described by its friends as a "CPU melter".
Harmonics #
And then the harmonics. A B3 note has a frequency of 493.883Hz, so one may reasonably expect an FFT like the one above, but with a peak at ~493Hz.
In fact, this is what the frequencies looks like when you hit a B3 string:
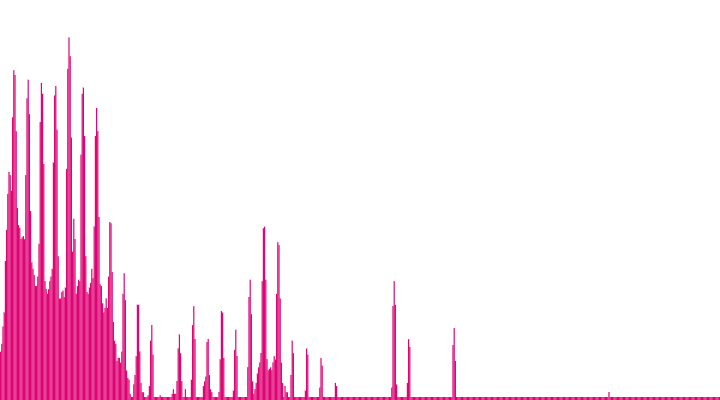
See how there are peaks all over the place? Each string brings its own special combination of frequencies with it, called harmonics. One thing is for sure: it's not a "pure" sample where you can infer that you're hitting a given string just from the most active frequency.
I'm a little hard of understanding sometimes, so I attempted to work around this with some good ol' fashioned number fishing and fudging. It kind of worked under very specific circumstances, but it really wasn't robust.
Audio Analysis the better way #
Then Chris Wilson helped me. For context, I'd got to the end of my hack-fudge approach and started googling for things like "please i am a clown how do you do simple pitch detection?" As you might expect, the top results were Wikipedia articles that may as well be written in Ancient Egyptian hieroglyphics for all the sense they make. They're seemingly written by people who already understand these topics, and whose sole aim seems to be to ensure that you won't. I got the same deal when I made a 3D engine a few years back and, as with that period in my life, all of me screamed out for simple, treat-me-like-a-human explanations. Thankfully that's exactly what Chris provided over the course of several hours.
Autocorrelation #
Attempt number two: autocorrelation. To be fair, autocorrelation had come up in my hieroglyphics studies, but it made zero sense. But Chris suggested it, and I gave it a whirl.
In retrospect I guess the name is a clue: auto- (self-) and correlation (matching). The idea is if you have an audio wave you can compare it to itself at various offsets. If you find a match then you have found where this wave repeats itself, even factoring in harmonics (more on that in a moment). Once you know when a wave repeats itself you have theoretically found its frequency.
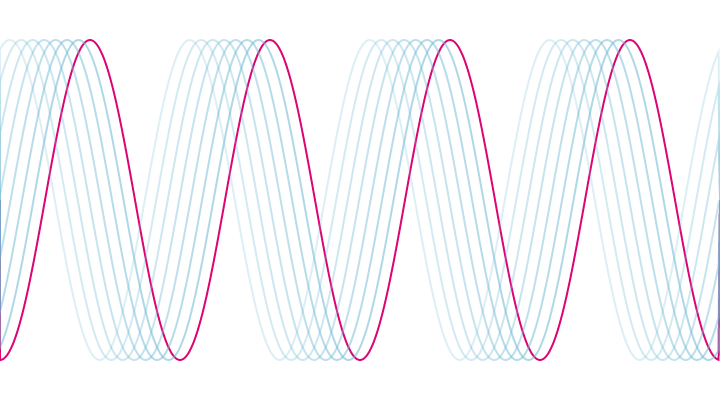
You can get the wave data from the Web Audio API (of course you can, what a lovely API) with getFloatTimeDomainData, which has nearly zero documentation and also sounds like a function named after buzz words' greatest hits. But it does precisely what we need it to: it populates an array with floating point wave data with values ranging between -1 and 1.
The fftSize property on the AnalyserNode is used to determine how much data you get. If you were to set fftSize to 48,000 (which you can't because the max limit is 32K and needs to be a power of 2, but stick with me), and you had a sample rate of 48kHz, you would get one second's worth of wave audio data. As it happens I set my fftSize to 4,096, which gives me 4,096 / 48,000 ~= 85ms of wave data. Because I planned to compare the wave against itself, I had half of that, around 42ms of audio data, available to me for each pass.
My first attempt at autocorrelation compared the wave across all offsets (half the buffer, or 2,048 elements) and then returned the offset which had provided the nearest match:
let buffer = new Float32Array(4096)
let halfBufferLength = Math.floor(buffer.length \* 0.5);
let difference = 0;
let smallestDifference = Math.POSITIVE_INFINITY;
let smallestDifferenceOffset = 0;

// Fill up the wave data.
analyserNode.getFloatTimeDomainData(buffer);

// Start an offset of 1. No point in comparing the wave
// to itself at offset 0.
for (let o = 1; o < halfBufferLength; o++) {

difference = 0;

for (let i = 0; i < halfBufferLength; i++) {
// For this iteration, work out what the
// difference is between the wave and the
// offset version.
difference += Math.abs(buffer[i] - buffer[i + o]);
}

// Average it out.
difference /= halfBufferLength;

// If this is the smallest difference so far hold it.
if (difference < smallestDifference) {
smallestDifference = difference;
smallestDifferenceOffset = o;
}
}

// Now we know which offset yielded the smallest
// difference we can convert it to a frequency.
return audioContext.sampleRate / smallestDifferenceOffset;
Ideally speaking one would do some curve fitting here to figure out exactly where the wave repeats itself, but I found I was getting good enough results without that. The main problem I had with this approach was getting it to run quickly enough. With an array of 4,096, I was going to end up doing potentially 2,048 * 2,047 = 4,192,256 calculations, which wasn't quick enough to be done inside 8-10ms on mobile.
What I needed to do was to limit the scope a little.
Strings and their frequencies. #
What I ended up doing was to do an initial pass where I just used 6 offsets, one for each string. Since I knew what frequency each string should be, I decided to offset the wave by that much and choose whichever string's offset yielded the lowest difference. The nearest match can then be considered the "target" string, kind of an "Oh, it looks like you're tuning the D3 string!" approach.
| String | Frequency | Offset (48Khz) |
|---|---|---|
| E2 | 82.4069 | 582 |
| A2 | 110.000 | 436 |
| D3 | 146.832 | 327 |
| G3 | 195.998 | 245 |
| B3 | 246.942 | 194 |
| E4 | 329.628 | 146 |
In a bid to try and make things more reliable I repeated the process across a time period of about 250ms and summed the differences per string.
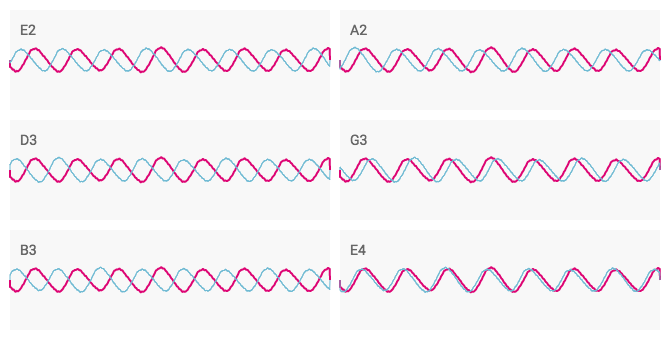
In the above image you can see the E4 string being plucked, and the various offset versions. You can also see that, when moved by E4's expected offset, the wave matches itself most closely than for any other offset, which is exactly what we want.
Now I had the candidate for the closest match, I used the code from above to figure out exactly how far away from the target frequency the plucked string was. Instead of using offsets from 0 to 2,048, however, I did it from (an admittedly random value of) ±10 either side of the expected offset for that string. The net result was far fewer overall comparisons, although at the cost of only supporting standard tuning. I figure there may be a version of this I'm missing which would allow me to support any tuning, but alas it eludes me. I am eluded.
So that's the audio processing explained. Whew.
45° Shadows #
Moving onto the visuals a moment. I was reminded how easy it is to make designs that can't be built easily. So it was with my 45° shadows hanging off the dial. Well done me.
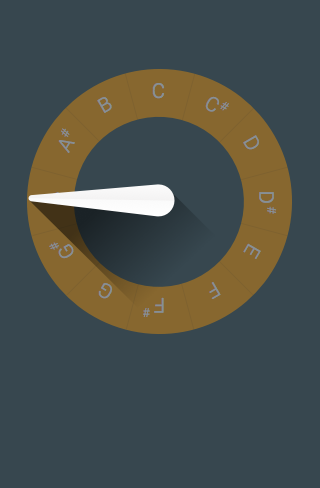
I was reminded how easy it is to make designs that can't be built easily.
I kept trying to figure out how the shadow should be "cast". I shall spare you the boring eleventy billion variants that didn't work out.
Eventually I realised that I kept turning my head about 45° to the left, and that was the clue I needed. What I was looking for were the left- and right-most points of the dial when looking at it at 45°. Or, put another way, rotate the points of the dial clockwise by 45° then order them by x. Then choose the 0th and last values, since they are the where the dial's extremities are.
To do that I created a number of marker points on the dial to capture the edges, and then rotated them in a sort function:
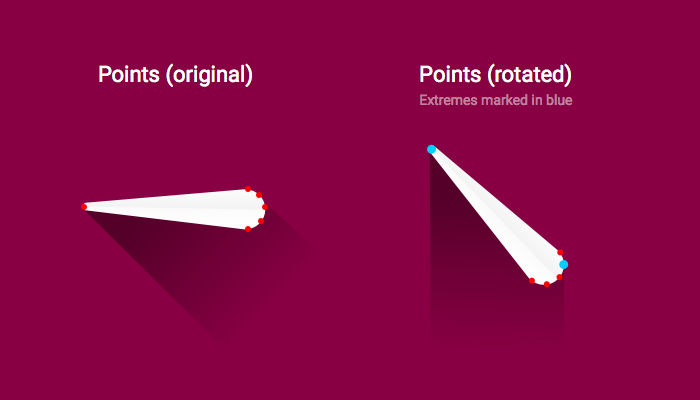
points.sort(function(a, b) {

// Take the point, rotate it by
// 45 degrees to the right,
// and _then_ sort it by its x value.

let adjustedAX = a.x _ pointCos - a.y _ pointSin;
let adjustedBX = b.x _ pointCos - b.y _ pointSin;

return adjustedAX - adjustedBX;
});
From there it's a case of drawing out the points as part of the shadow and, when you hit the right-most point start the drop down for the shadow, go along the bottom and come back up to the left-most point. Ta-daaaa!
Versioning and Service Workers #
Finally, I just wanted to share one little tip about working with Service Workers that I've found helpful. I came across a gulp plugin called bump. It's useful for taking the version in your package.json file and incrementing the number. (You tell it if it's a patch, major or minor revision.)
When I'm cutting a release I bump the version automatically using it. If I want to do major or minor versions I'll just tweak the package.json file myself, but for patching it'll do it for me during the build.
gulp.task('bump', function() {
return gulp.src('./package.json')
.pipe(bump({type:'patch'}))
.pipe(gulp.dest('./'));
});
Whenever I run the tasks that write out the Service Worker, or anywhere else where I might want to include the version number, I grab the version from package.json and do a string replace on the target file.
What this gives me is the assurance that I won't accidentally leave my users on an old version of the app due to an unchanged Service Worker. The Service Worker has the version string in it and, in my case, I also use that as part of its cache's name:
// In the Service Worker... As authored:
var CACHE_VERSION = '@VERSION@';

// Once the version has been pulled, and string
// replacements are done and dusted:
var CACHE_VERSION = '1.0.63';
Now when I push a new version the Service Worker will be fetched, found to be different, and the new version will be installed. For a more complex upgrade process you could do diffs and so on when you see a new version, but that would have been overkill for this particular app.
Tune on! #
Wow, that's one monster of a write-up! If you've made it this far thanks for sticking with me. I hope you've found something of interest! It's certainly been cathartic for me to share it all, anyway.
You can check out the source code, and the Guitar Tuner app is available at guitar-tuner.appspot.com!